How I Set Up a 3 Node Kubernetes Cluster
Six months ago, I started a new job as a DevSecOps engineer. During the interview process, the team gave me a heads up about what tools they used. I was excited to learn Kubernetes was one of them. I thought to myself, “Cool, I’ll be ready. I’ve done a few tutorials on this.” But after the first few days,I quickly realized I was wrong—I was not ready 😂. I wasn’t just dealing with single-container pods like in the tutorials. I was now faced with terms like Ingress, CRDs, and PVCs… none of it made sense. The days of simple tutorials were long gone. I needed a homelab to start building for real. I ordered the following beelink, installed proxmox, and hit the ground running.
In this post I’ll be walking through how I set up a 3 node kubernetes cluster
Requirements
- 3 VMs
- 2 GB or more of RAM per machine
- 2 CPUs or more for control plane machines.
- OS - I’m using Rocky Linux
On Every Node
The following should be completed on every node.
Disable Swap
To turn off swap immediately, run sudo swapoff -a.
To ensure swap is disabled permanently, in /etc/fstab comment out the line that declares swap.
#/dev/mapper/rl-swap none swap defaults 0 0
Confirm by running the free command. You should see 0s for the Swap row.
[xavier@lab-cp ~]$ free -m
               total        used        free      shared  buff/cache   available
Mem:            3562        1725         769          17        1316        1836
Swap:              0           0           0
Install Containerd
# This command adds the docker repoistory
sudo dnf config-manager --add-repo https://download.docker.com/linux/centos/docker-ce.repo

# This command installs containerd
sudo dnf install containerd
Ensure containerd is healthy:
[xavier@lab-cp ~]$ systemctl status containerd
● containerd.service - containerd container runtime
     Loaded: loaded (/usr/lib/systemd/system/containerd.service; enabled; preset: disabled)
     Active: active (running) since Tue 2025-01-21 18:32:57 EST; 2 weeks 1 day ago
       Docs: https://containerd.io
Install kubelet, kubeadm, and kubectl
kubeadm: A tool that helps bootstrap and manage Kubernetes clusters.
kubectl: The command-line tool used to interact with the Kubernetes API and manage cluster resources.
# This overwrites any existing configuration in /etc/yum.repos.d/kubernetes.repo
cat <<EOF | sudo tee /etc/yum.repos.d/kubernetes.repo
[kubernetes]
name=Kubernetes
baseurl=https://pkgs.k8s.io/core:/stable:/v1.32/rpm/
enabled=1
gpgcheck=1
gpgkey=https://pkgs.k8s.io/core:/stable:/v1.32/rpm/repodata/repomd.xml.key
exclude=kubelet kubeadm kubectl cri-tools kubernetes-cni
EOF

#--disableexcludes=kubernetes ensures that no repository exclusions prevent the installation of these packages.
sudo yum install -y kubelet kubeadm kubectl --disableexcludes=kubernetes
Configure cgroup Driver
# This command moves (renames) the existing config.toml file to config.toml.bak as a backup.
$ sudo mv /etc/containerd/config.toml /etc/containerd/config.toml.bak

# This command generates the default configuration for containerd, a container runtime, and writes it to a new config.toml file.
$ containerd config default > config.toml
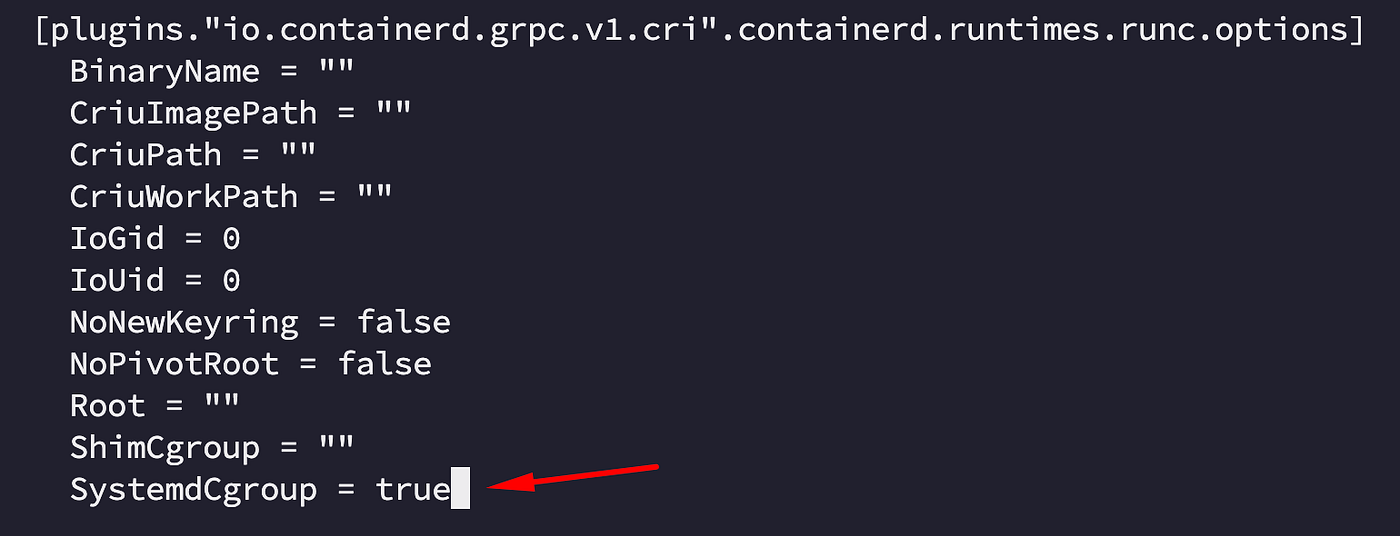
In the config.toml file, set SystemdCgroup to true
Network Configuration
Load the necessary kernel modules:
sudo modprobe overlay
sudo modprobe br_netfilter
Edit the /etc/sysctl.d/k8s.conf file.
net.ipv4.ip_forward = 1
net.bridge.bridge-nf-call-ip6tables = 1
net.bridge.bridge-nf-call-iptables = 1
sudo sysctl --system
On The Control Plane Only
The following should be completed on the control plane, only.
Open The Required Ports
| Protocol | Direction | Port Range | Purpose | Used By |
|---|---|---|---|---|
| TCP | Inbound | 6443 | Kubernetes API server | All |
| TCP | Inbound | 2379-2380 | etcd server client API | kube-apiserver, etcd |
| TCP | Inbound | 10250 | Kubelet API | Self, Control plane |
| TCP | Inbound | 10259 | kube-scheduler | Self |
| TCP | Inbound | 10257 | kube-controller-manager | Self |
Initialize The Cluster
sudo kubeadm init --apiserver-advertise-address {HOST IP} --pod-network-cidr 10.244.0.0/16
If you’re successful, you’ll get something like :
Your Kubernetes control-plane has initialized successfully!

To start using your cluster, you need to run the following as a regular user:

  mkdir -p $HOME/.kube
  sudo cp -i /etc/kubernetes/admin.conf $HOME/.kube/config
  sudo chown $(id -u):$(id -g) $HOME/.kube/config

Alternatively, if you are the root user, you can run:

  export KUBECONFIG=/etc/kubernetes/admin.conf

You should now deploy a pod network to the cluster.
Run "kubectl apply -f [podnetwork].yaml" with one of the options listed at:
  https://kubernetes.io/docs/concepts/cluster-administration/addons/

Then you can join any number of worker nodes by running the following on each as root:

kubeadm join {HOST IP}:6443 --token {TOKEN} \
	--discovery-token-ca-cert-hash sha256:{HASH}
Save this output somewhere. You’ll need it shortly.
Set Up KUBECONFIG
mkdir -p $HOME/.kube
sudo cp -i /etc/kubernetes/admin.conf $HOME/.kube/config
sudo chown $(id -u):$(id -g) $HOME/.kube/config
Deploy A CNI
In order for your pods to communicate with each other, you need to install a Container Network Interface(CNI)
On The Worker Nodes Only
The following should be completed on the worker nodes only.
Open The Required Ports
| Protocol | Direction | Port Range | Purpose | Used By |
|---|---|---|---|---|
| TCP | Inbound | 10250 | Kubelet API | Self, Control plane |
| TCP | Inbound | 10256 | kube-proxy | Self, Load balancers |
| TCP | Inbound | 30000-32767 | NodePort Services† | All |
Now you can join worker nodes to the control plane. From the output you saved earlier, as sudo, run the kubeadm join command.
kubeadm join {HOST IP}:6443 --token {TOKEN} --discovery-token-ca-cert-hash sha256:{HASH}
This will take a few minutes, but if it was successful, you’ll get a message with the following. This node has joined the cluster
Conclusion
If all went well, you should now have a 3 node cluster! To verify, create a pod
[xavier@lab-cp ~]$ kubectl run mypod --image=nginx:latest
pod/mypod created
[xavier@lab-cp ~]$ k get pods
NAME            READY   STATUS    RESTARTS   AGE
mypod           1/1     Running   0          36s
There are much easier ways to set up a cluster, but using kubeadm gives you a deeper understanding of how Kubernetes works under the hood.
This method also provides more flexibility, allowing you to customize your setup based on your needs. Whether you’re setting up a test environment or preparing for a production deployment, mastering the fundamentals will make troubleshooting and scaling your cluster much easier.
Xavier Alexander Newsletter
Join the newsletter to receive the latest updates in your inbox.